Fiberglass and Delamination
RV Delamination Repair for Coaches and Trailers
In short
Delamination is an adhesive bond failure between the outer fiberglass skin and the luan substrate behind it, almost always after water got into the wall. Repairs at our Westminster shop run $1,500 to $20,000 or more, and the deciding factor is whether the substrate is still dry and sound enough for resin injection or the wall has to be opened and rebuilt.
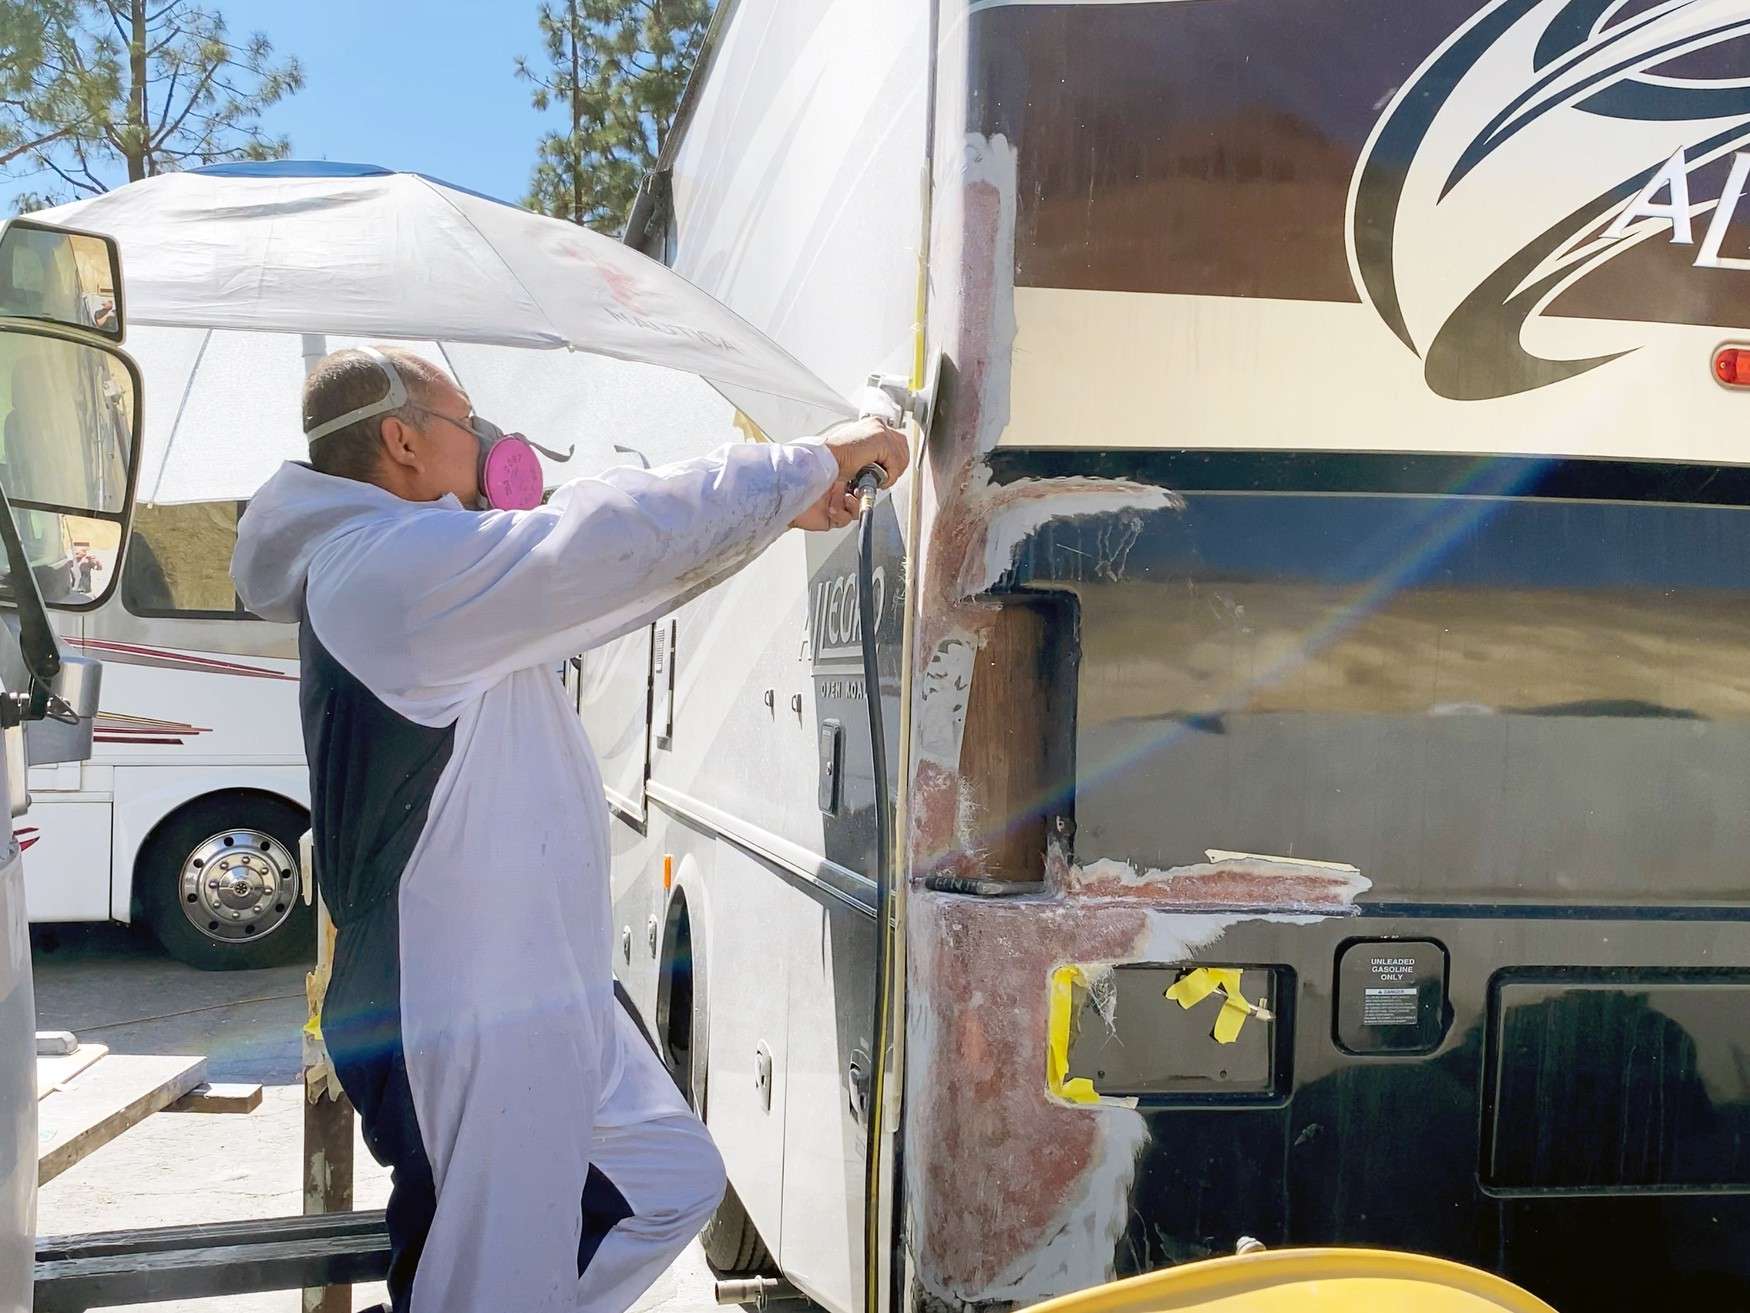
Most owners call us about rv delamination repair after they notice a soft wave or a bubble in the sidewall that was not there last season. That bubble is not a cosmetic blemish. It is the outer fiberglass skin releasing from the luan and foam behind it, and the released area is always larger than what your eye can see. Our estimators in Westminster map the real boundary before quoting anything, because the map decides the method.
What Delamination Actually Is
Delamination is a bond failure, not a material failure. An RV sidewall is a sandwich: gelcoated fiberglass on the outside, a thin luan plywood layer bonded to the back of it, block foam insulation, aluminum or wood framing, and an interior panel. All of that is pressed together with adhesive in a heated roller press at the factory. When the adhesive between the fiberglass and the luan lets go, the skin has nothing holding it flat, so it moves. That movement is the wave you are looking at.
Water is the usual cause. It gets past a sealant joint at a window flange, a marker light, an awning rail fastener, or a roof edge, then wicks sideways through the luan. Wet luan swells, loses its glue line, and eventually turns to soft pulp. Heat accelerates all of it. A coach parked in Southern California sun sees the outer skin climb well past 140 degrees on a summer afternoon, and that thermal cycling works the weakened bond loose a little more every single day.
The second cause is age plus flex. Older coaches built with early polyester adhesive systems lose bond strength over twenty years even when they stay dry, and every mile of road input flexes the panel. That kind of dry delamination shows up as broad, shallow waves across a large area rather than a tight bubble around one fastener. The repair path is completely different for each, which is why we do not quote this job from a photograph.
- A bubble or wave that changes shape between a cool morning and a hot afternoon
- Hollow or drummy sound when you tap the panel with a knuckle or a coin
- Dark staining or a soft spot on the interior wall near a window corner
- Sealant that has pulled away from a flange, roof edge, or awning rail
- Panel edges that no longer sit flush at a seam or under a corner molding
Tap Testing and Mapping the Failed Area
Every delamination estimate starts with a tap test. We use a plastic tap hammer or a coin and work a grid across the panel, listening for the change from a tight, sharp click to a dull, hollow thud. Bonded laminate rings. Released laminate thuds. We chalk the transition line as we find it, then step back and look at the shape we just drew. That outline is the real repair area, and it is routinely two to four times the size of the visible bubble.
The shape also tells us where the water came in. A teardrop that narrows toward a window corner points at the window flange. A long horizontal band under the awning rail points at rail fasteners. A bloom low on the wall usually means water traveled down inside the cavity and pooled on the bottom plate. Finding the source matters more than the patch itself, because a beautifully repaired panel sitting over an active leak will delaminate again inside of one season.
We photograph the chalk map and attach it to the estimate so you can see what we saw. If the mapped area is under roughly six square feet and the source is a single failed seal, injection is usually on the table. Once the map crosses a framing member or runs into a panel seam, we start pricing the open-wall path instead, because resin cannot flow into a cavity that is divided by a stud.
- Grid tap the entire panel, not only the area around the visible defect
- Chalk the boundary where the sound changes, then photograph the outline
- Trace that outline back toward the most likely water entry point
- Probe the interior wall and floor for softness at the low corners
- Pull a suspect fixture or flange to confirm the source before quoting
Moisture Readings and What a Percentage Means
A pin type or pinless moisture meter reads relative moisture content in the substrate behind the skin. On a healthy wall we expect single digits, roughly 6 to 12 percent depending on ambient humidity. Readings in the high teens mean water is present and the luan is compromised. Anything above 20 percent means the wood is saturated and the glue line in that zone is already gone, whether or not the skin has visibly moved yet.
A percentage on its own is not a diagnosis. Meters read differently through gelcoat than through an interior panel, and metal framing behind the pad can throw a false high reading. We take a grid of readings, note the dry baseline on a known good section of the same wall, and compare. What matters is the delta and the pattern, not one number. A single spike over a stud is usually just the stud. A wide plateau of elevated readings is a wet cavity.
If the panel is wet, nothing gets bonded until it is dry. Adhesives and resins will not develop strength against damp wood, and trapping moisture inside a sealed wall creates rot that surfaces two years later as a much larger bill. Drying an opened cavity with air movers and dehumidification in our shop typically takes 3 to 10 days. We re-meter before we bond, and we will hold the coach on the rack rather than bond a wet wall.
Injection and Vacuum Clamping Versus Opening the Wall
Injection is the less invasive path. We drill small ports through the skin on a grid inside the mapped area, flush and dry the cavity, then inject a low viscosity epoxy or a two part urethane adhesive formulated to fill a gap and still bond. Vacuum bags or a bank of clamping cauls with plywood platens pull the skin back down flat while the adhesive cures. Ports are then filled, faired, and refinished. Done correctly, the panel returns to flat and the port grid disappears under paint.
Injection only works under specific conditions. The luan has to be intact and dry, the framing has to be sound, and the released area has to be reachable from the port grid without a stud blocking the flow. If the substrate is pulpy, the resin has nothing to grab, and you end up with a stiff patch surrounded by wall that is still failing. We are direct with owners about this. Paying for injection over rotted luan buys a cosmetic delay, not a repair.
The open-wall path means removing either the interior panel or the exterior skin to reach the substrate. Interior access preserves the exterior finish and avoids a large paint blend, which is a serious cost lever, but it means pulling cabinets, wiring, plumbing, and trim. Exterior access is faster on the structural side and much more expensive to refinish. Which side we open is a real decision with real tradeoffs, and we walk through it with you at the estimate rather than defaulting to one.
- Injection candidates: dry substrate, sound framing, mapped area under about six square feet
- Vacuum bag or caul clamping held for the full adhesive cure window, not just the tack time
- Open-wall candidates: soft luan, corroded or rotted framing, seam crossings, repeat failures
- Interior access protects the exterior finish but adds cabinet, wiring, and trim labor
- Exterior access is quicker on structure and pulls a paint blend into the estimate
- Either path stops until meter readings come back down to the dry baseline
Rotted Luan, Framing, and Structural Replacement
Once the wall is open, the scope is whatever the scope is. Soft luan gets cut back to sound material with a track saw set to skin depth, and new exterior grade plywood is scarfed in. Aluminum framing that has corroded at a wet joint gets cut and spliced with new extrusion and structural rivets. Wood framing that crumbles under a screwdriver tip gets replaced outright. Waterlogged insulation comes out, because saturated block foam holds water against every surface it touches.
This is where estimates move. An owner approves a $3,000 injection scope, we cut a small inspection window because the meter says wet, and we find eighteen inches of rotted bottom plate and two corroded studs. That is a different job. We stop, photograph, write a supplement, and call you before any additional labor goes on the ticket. Nobody enjoys that phone call, but it is far better than a freshly bonded wall sitting on top of rot.
Structural work also changes the timeline. Splicing framing, rebuilding a bottom plate, and drying the cavity is measured in weeks, not days. Factory extrusion or a matched interior panel may be on backorder from the coach builder. We give you a realistic date at the supplement, and we update that date if a part slips rather than letting your coach quietly sit in the back of the building.
Pricing, Deposits, and Time on the Rack
Body and paint labor is billed at $210 per hour, paint supplies at $55 per paint hour, and parts carry 100 percent markup at or under $100 and 35 percent over $100. Sales tax of 7.75 percent applies to parts and materials, not to labor. A written estimate is paid work; the RV systems assessment is $150 and is credited against an authorized repair. Any authorized repair above $2,000 takes a 50 percent deposit before we order materials or schedule bay time.
A small injection repair on a single dry panel lands near the bottom of the $1,500 to $20,000+ range. A full sidewall on a 40 foot diesel coach with rotted framing, new luan, a replaced interior panel, and a paint blend across two adjacent panels lands at the top and can pass it. That spread is honest, not padded. The variable is what the substrate looks like once the skin comes off, and nobody knows that from the outside.
Plan on your coach being with us longer than a car would be in a collision shop. Drying alone eats a week. Adhesive cure windows on a clamped panel cannot be rushed with heat without risking print-through later. Add refinishing and cure time and most delamination jobs run 2 to 8 weeks. We build a schedule at the estimate, and you get an updated date every time scope changes. Call (949) 799-3387 if you want the process walked through before you bring it in.
- $210 per hour body and paint labor, plus $55 per paint hour in supplies
- $150 RV systems assessment, credited against an authorized repair
- 50 percent deposit on any authorized repair above $2,000
- 7.75 percent tax on parts and materials only, never on labor
- Supplements are written, photographed, and approved before work continues
Questions
Frequently asked questions
Can you fix delamination without taking the wall apart?
Sometimes. Injection with vacuum clamping avoids opening the wall, and on the right coach it produces a flat, durable panel. The conditions are narrow though. The luan behind the skin has to be intact and dry, the framing has to be sound, and the released area has to be small enough and open enough that adhesive can reach all of it from a port grid. We determine that with a tap map and a grid of moisture readings, not a glance. If the meter comes back wet or the panel sounds hollow across a stud line, injection is the wrong tool and we will say so before you spend money on it.
How do I know if the bubble is spreading?
Take a photograph with a tape measure laid alongside the bubble, in the same light, once a month. Delamination almost never reverses, and thermal cycling drives it outward, so a growing outline over sixty days confirms an active problem. A faster check is the tap test. Work outward from the bubble with a coin and listen for where the sound changes from a sharp click to a hollow thud. If that boundary sits well outside the visible bubble, the failure is already larger than it looks. Also watch the interior wall for a soft spot or staining, which usually means water is still getting in.
What does a moisture reading of 25 percent mean for my coach?
It means the luan in that spot is saturated and the adhesive bond there is finished. Healthy substrate reads roughly 6 to 12 percent. High teens means water is present and doing damage. Above 20 percent, the wood has taken on enough water that it has lost strength, the glue line is gone, and rot is likely underway even if the skin still looks flat. One high reading is not the whole story though, because framing behind the meter pad can skew a number. We map a grid, compare against a dry baseline on the same wall, and look for a wide plateau of elevated readings rather than a single spike.
Will the repair be invisible when it is done?
On a painted coach, yes, in most cases. Injection ports get filled, faired, block sanded, primed, and refinished with a blend into the adjacent panels, and a good blend is not detectable in normal light. Gelcoated coaches are harder because gelcoat color and texture drift with age, and a spot repair in gelcoat rarely matches a twenty year old panel. On those we usually recommend refinishing the full panel to a natural break line. Print-through is the other risk: if adhesive cure is rushed or the substrate is not flat, a faint outline can telegraph through the paint months later, which is why cure time is not optional.
My adjuster called it cosmetic damage. Is it?
Not usually. Delamination is a structural bond failure in a composite sandwich panel, and the panel is part of what keeps the sidewall stiff. Once the skin releases, the wall loses shear stiffness in that area, which means more flex, more sealant movement at the flanges, and more water intrusion. The wet luan behind it is also actively rotting the framing it touches. We document all of it with tap maps, moisture grids, and photographs, and that documentation is what an adjuster needs to reclassify the loss. If the delamination followed a specific water intrusion event rather than age, the documentation matters even more.
How long will my RV be in the shop?
Most jobs run 2 to 8 weeks. A dry, small injection repair on one panel can be done in about two weeks including refinishing and cure. Anything involving wet substrate adds drying time, which is typically 3 to 10 days with air movers and dehumidification before we are allowed to bond anything. Open-wall repairs with framing splices, new luan, and interior panel work run four weeks and up, and parts backorders from the coach builder can extend that further. We give you a target date at the estimate and update it in writing whenever the scope changes.
Is delamination repair worth it on an older coach?
It depends on what the rest of the coach looks like and what you paid for it. If the chassis and drivetrain are healthy, the roof is sound, and the interior is in good shape, a $6,000 sidewall repair on a coach worth $45,000 is straightforward math. If the roof is also failing, the floor is soft at the slide, and three walls sound hollow, you are looking at a much larger number and it is worth having an honest conversation before you commit. We will tell you what we find, including when we think the total is going to outrun the value of the vehicle.
Do I have to fix the leak too, or just the delamination?
You have to fix the leak. Bonding a panel over an active water path is throwing money away, because the new adhesive will let go the same way the original did, usually within a season or two. Part of the estimate is tracing the source: pulling a window flange, checking awning rail fasteners, inspecting roof edge sealant, or water testing the suspect area. Resealing penetrations is inexpensive compared to the panel work, and it is the part that determines whether the repair lasts. If we cannot find a source, we say so and we water test before we bond.
Standard on every job
What is included
These are not upgrades. They are how the work is run on every vehicle that comes through the building.
Full teardown where it is needed
We do not estimate through a closed panel. If the damage path runs behind trim or skin, we open it and document what is actually there.
Written, itemized scope
Parts, labor hours, and materials listed separately against the posted rate, so every line is something you can question.
Direct carrier communication
We talk to the adjuster so you are not relaying technical detail between two parties who both expect you to already understand it.
Supplement handling
When teardown finds more than the original inspection, we document and submit the supplement rather than absorbing it into a vague overage.
Correct repair sequence
Structural before cosmetic, every time. A straight body over a bent frame is a repair that fails its second life.
Systems tested under load
Electrical, plumbing, generator, and climate systems are run and verified before delivery, not just reconnected and assumed good.
Photo documentation throughout
Before, during, and after. Useful for your records, and decisive if a claim is ever revisited.
Delivery walkthrough
We go over what was done, what was replaced, and what to watch, in person, with the vehicle in front of you.
How the work runs
Our six step repair process
The same sequence on every vehicle, whether it is a single coach or a fleet of box trucks.
- 01
Assessment and documentation
We put the vehicle on the floor, pull panels where we need to see behind them, and photograph everything. Hidden damage found now is damage that does not become a supplement argument later.
- 02
Written estimate
You get a line by line estimate with parts, labor hours, materials, and the posted rate applied to each. Nothing is bundled into a single number you cannot check.
- 03
Carrier coordination
If a claim is involved we deal with the adjuster directly, submit the documentation, and handle supplements when teardown reveals more than the first inspection showed.
- 04
Authorization and scheduling
Once the scope is approved we confirm the deposit, order parts, and give you a realistic slot. Special order parts drive the timeline more often than labor does.
- 05
Repair
Structural first, then body, then paint, then systems and interior. The sequence is not negotiable because each stage has to be right before the next one covers it up.
- 06
Quality check and delivery
Multi point inspection, systems tested under load, paint inspected under corrected lighting, and a walkthrough with you before the vehicle leaves.
Keep reading
Related pages
Related services
Vehicles we repair
Talk to a repair specialist today
Tell us what happened and we will tell you what the repair actually involves, what it costs, and how long it takes. We work directly with every major carrier and serve Westminster owners and fleets from our 35,000 square foot facility.
Posted labor rates are published on our prices page. Diagnostic and systems assessment fees are credited against an authorized repair.