Fiberglass and Delamination
Fiberglass Crack and Hole Repair on RVs and Trailers
In short
A structural fiberglass repair is not filler. The damaged laminate is ground out to a long scarf bevel, rebuilt with mat and biaxial cloth in the correct resin, cured, then blocked flat and refinished. At our Westminster shop that work runs $750 to $6,500 or more depending on panel size, curvature, and how much of the finish has to be blended.
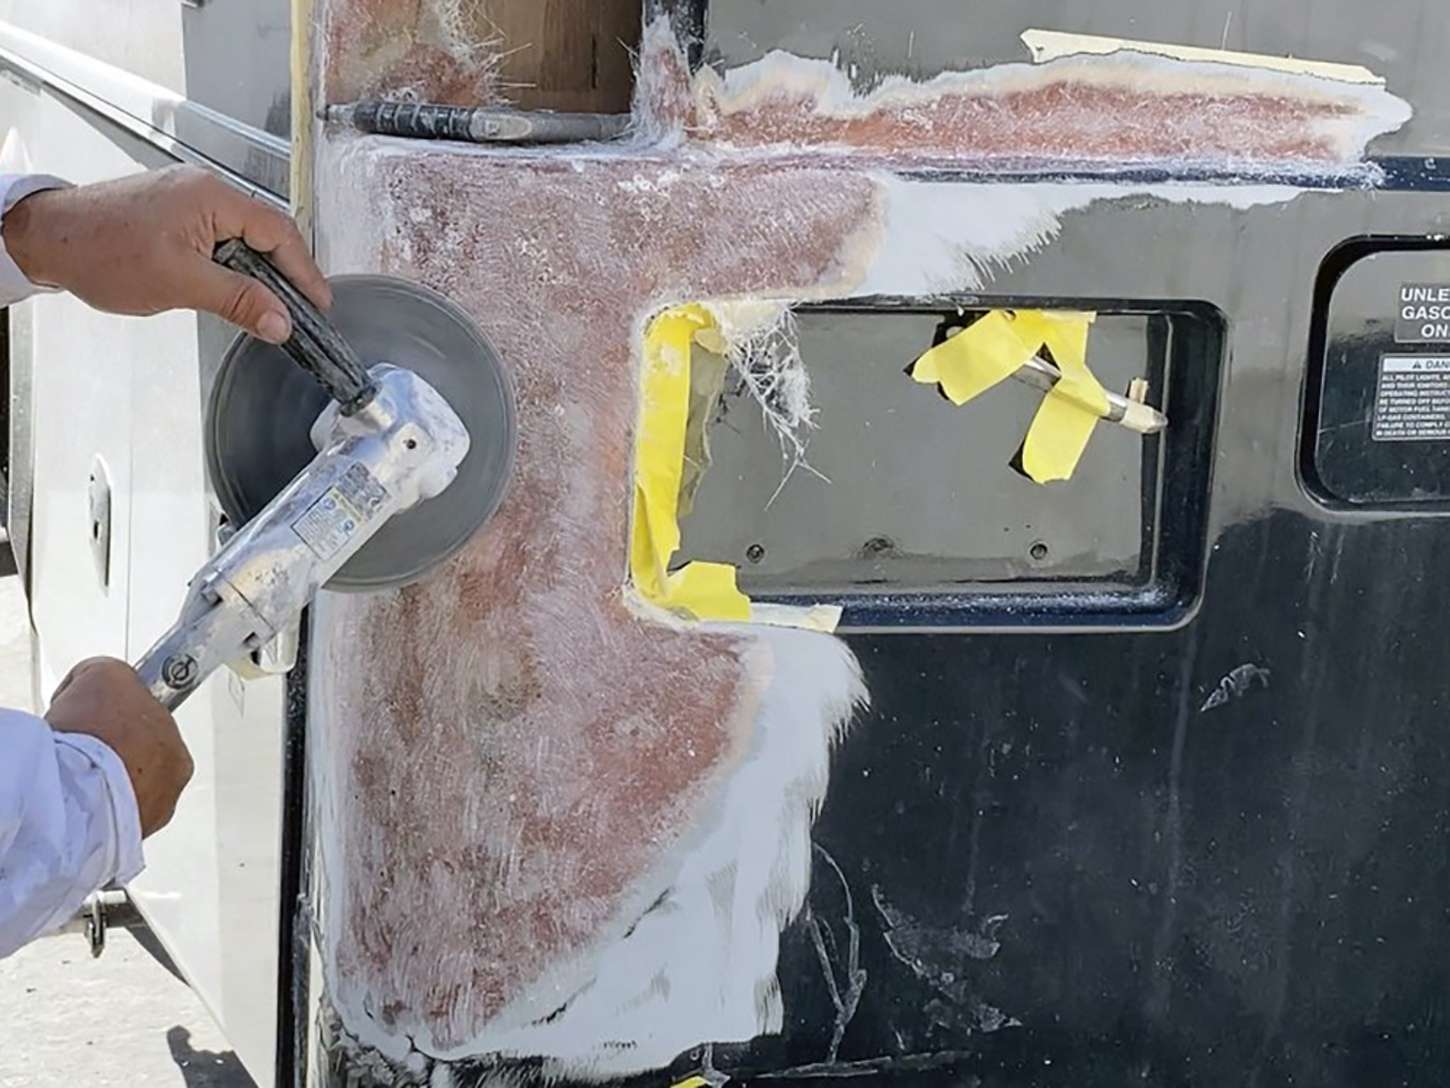
Proper fiberglass crack and hole repair starts with figuring out which of three very different problems you actually have, because the fix for each one is not the same. Surface crazing lives only in the gelcoat. A stress crack runs through the laminate and comes back if the load that caused it is not addressed. An impact puncture shatters fiber over an area much wider than the hole. Owners bring these to our Westminster shop every week, and the first thing we do is sort them.
Spider Cracks, Stress Cracks, and Impact Punctures
Spider cracking, also called crazing, is a fine web of shallow lines that lives in the gelcoat and stops before it reaches the glass. It happens where the factory sprayed gelcoat too heavy, usually in a molded radius or a corner where the resin pooled. Thick gelcoat is brittle, and twenty years of thermal cycling eventually crack it. The laminate underneath is fine. The repair is grinding out the crazed layer, refilling, and refinishing, which is the least expensive category on this page.
A stress crack is a different animal. It runs in a fairly straight line, often radiating from a single point, and it goes through the gelcoat into the laminate. The point it radiates from is the clue: a fastener hole, a hard corner, a bonded mounting boss for a ladder or awning bracket, or a place where the panel is pinned so tightly it cannot flex. Fill it without addressing the load and it comes back in the same place within a year.
An impact puncture is mechanical damage. Fibers are broken, the laminate is crushed around the entry point, and there is almost always a halo of released bond extending well past the visible hole. Tap the area and you will hear it. That halo has to be included in the repair, or the patch ends up bonded to laminate that is already failing. Punctures on lower panels also frequently hide bent framing behind them, which we check before quoting.
- Crazing: fine web, shallow, no line you can catch with a fingernail
- Stress crack: straight, radiating from a fastener, corner, or bonded boss
- Puncture: broken fibers, crushed laminate, drummy halo around the hole
- Any crack you can feel with a fingernail is into the laminate, not just gelcoat
- Cracks that reappear after a previous repair almost always mean a load problem
Why Front Caps Crack at Fasteners and Molded Corners
A front or rear cap is one large molded part carrying loads it was never especially good at carrying. It is thin through the big flat areas and thick where resin pooled in the tight corners of the mold. It is fastened to the coach at a limited number of hard points, and it has to absorb chassis twist on uneven ground plus wind load at road speed. The laminate immediately around a fastener cannot flex, so all of that movement concentrates at the edge of the washer and cracks there.
Molded corners fail for a manufacturing reason. Reinforcement fabric does not drape into a tight radius, so the corner ends up resin rich and fiber poor. Resin without enough glass in it is brittle. Add a ladder bracket, a marker light, a roof rack foot, or an awning arm bolted through that area, and you have a stress riser sitting in the weakest section of the part. That combination accounts for most of the cap cracks we see on coaches over ten years old.
Because of that, a good repair does more than rebuild laminate. We look at whether the fastener can be relieved with an oversized hole and a bonded insert, whether a rubber isolator or a larger backing plate spreads the load, and whether the area behind the crack needs a bonded stiffener or an extra ply of biaxial to raise local stiffness. Skipping that step is why owners tell us the same crack has been repaired twice already.
Grinding a Scarf Bevel Back to Sound Laminate
You cannot fill a structural crack and call it repaired. Filler has no tensile strength and no bond area, so the crack simply moves through it. A real repair removes the damaged material and rebuilds a bonded joint with enough surface area to carry load. That means grinding a scarf bevel, a long shallow taper cut back through each ply so the new laminate can key into the old. The common ratio is 12 to 1, and up to 20 to 1 in high load areas.
In practice, an eighth inch laminate needs roughly an inch and a half of bevel on each side of the damage. We stop-drill the ends of a crack first so it cannot run while we work, then grind with 36 or 50 grit on a random orbit sander, feathering out to clean, uniform glass. You can see when you are into sound material because the ply pattern becomes continuous and the white crack tracks stop showing. Dust extraction runs the whole time, and the shop is EPA registered under CAL000367879.
Prep after grinding matters as much as the grinding. Old panels are loaded with wax, silicone from years of detail products, and road film, all of which will ruin a secondary bond. We wash, then wipe with acetone on clean cloth and change cloths often so we are not just moving contamination around. The bevel stays covered and untouched by bare hands until the layup goes in, because skin oil on a prepared bond surface is a real cause of repair failure.
- Stop-drill the ends of every crack before grinding so it cannot propagate
- Grind a 12 to 1 scarf, longer on high load areas like cap corners
- Feather to clean, continuous ply pattern with no white crack tracks left
- Back the repair from inside with an extra ply wherever access allows
- Wash, then acetone wipe with fresh cloths, and keep bare hands off the bevel
Choosing Chopped Strand, Woven Roving, or Biaxial Cloth
Chopped strand mat is random short fiber held together with a binder. It conforms to curves well, wets out easily in polyester, and is the right choice for building thickness and for the first ply against a ground bevel because it fills irregularity. What it is not is strong for its weight. It carries a high resin fraction and low fiber content, so a repair built entirely from mat ends up heavy, thick, and weaker than the panel around it.
Woven roving is strong along the two fiber directions but the over-and-under weave creates crimp, and crimp both reduces strength and telegraphs a weave pattern into the finish months later. Stitched biaxial fabric solves that. The fibers lie flat at plus and minus 45 degrees and are stitched rather than woven, so there is no crimp, interlaminar strength is better, and it drapes over compound curves without bridging. On most RV panel repairs we build with alternating mat and biaxial.
The layup schedule is shingled. Each successive ply is cut slightly larger than the one below so the ply edges stagger up the bevel instead of stacking into a hard step. The final ply is a light mat or surfacing veil, which keeps the coarse fabric texture from printing through the topcoat. Wherever we can reach the back side of the panel, we add a backing laminate there too, which doubles bond area and takes stress off the cosmetic side.
Resin Selection and Adhesion to Aged Gelcoat
Polyester resin is what most RV panels were built with. It is inexpensive, cures fast, and its styrene content bites into existing polyester laminate reasonably well. Its weaknesses are meaningful though: it shrinks as it cures, it absorbs water over time, and its secondary bond to a fully cured surface is the weakest of the three options. We use it where the panel is low stress and where the finish will be gelcoat rather than urethane paint.
Vinylester sits in the middle and is our usual default. It has better toughness, noticeably better water resistance, and a stronger secondary bond than polyester, at a moderate cost increase. Epoxy has the best adhesion and the lowest shrinkage of anything we use, which makes it the right pick for high load repairs and for bonding to contaminated or aged substrate. The catch is that polyester gelcoat will not cure properly over epoxy, so if the panel is getting a gelcoat finish, epoxy underneath creates a problem.
Aged gelcoat is the other adhesion variable. Twenty years of UV has degraded the surface resin, and years of wax and silicone based detail products have soaked into it. None of that gets removed by a quick solvent wipe. We sand the bond zone aggressively, wash, then wipe, and on badly contaminated panels we sand a second time after washing. Shop temperature and catalyst ratio are controlled as well, because a resin kicked too hot exotherms, shrinks more, and prints through later.
- Polyester: lowest cost, fast cure, best where gelcoat will be the final finish
- Vinylester: better toughness and water resistance, our common default
- Epoxy: strongest adhesion and lowest shrink, but not under polyester gelcoat
- Sand aggressively, wash, then acetone wipe with clean cloths every pass
- Control shop temperature and catalyst ratio so the laminate does not exotherm
Cure, Post-Cure, and Blocking Flat Before Refinishing
Gel time is not cure time. A polyester or vinylester laminate gels in twenty minutes and feels hard in an hour, but it is nowhere near full strength. At normal shop temperature it reaches most of its properties in about 24 hours and continues to develop for days after that. Residual styrene keeps reacting and the laminate keeps shrinking slightly the entire time. Refinishing over a laminate that is still moving is the single most common reason a repair ghosts through the paint later.
We post-cure with controlled heat where the panel allows it. Holding the repair at a moderate elevated temperature drives the reaction closer to completion, pushes residual shrinkage out before paint rather than after, and stabilizes the surface. It is not a heat lamp aimed at the patch, because uneven heat causes its own distortion. Post-cure is one of the steps owners never see and never think about, and it is a large part of why one repair stays invisible and another shows a faint outline in six months.
Then it gets flat. Long boards and rigid blocks cut the repair to the surrounding contour, a thin skim of polyester glaze fills pinholes, high build primer goes on, a contrasting control coat gets misted over the primer, and block sanding continues until that control coat is gone everywhere at once. Body and paint labor is $210 per hour with $55 per paint hour in supplies, so blocking and blending is usually the larger half of the invoice on a crack repair, not the glass work.
Questions
Frequently asked questions
Can I just fill the crack with body filler and paint over it?
You can, and it will crack again, usually along the same line and usually within a year. Filler is a shaping material with essentially no tensile strength and no meaningful bond area on a beveled joint. The crack is a load path, and the load does not go away because the gap is full. A structural repair works because the ground scarf bevel creates a large bonded area between old and new laminate, and the new glass carries load across the joint. If the panel is only crazed in the gelcoat and there is nothing structural below it, then a fill and refinish is legitimately the right repair.
Why does the same crack keep coming back after being repaired?
Almost always because the previous repair rebuilt the material but never addressed the load. Cracks radiate from stress risers: a fastener that pins the panel so it cannot flex, a bonded bracket with too small a footprint, a molded corner that is resin rich and brittle, or a mounting point transferring chassis twist directly into thin laminate. Rebuild the laminate and leave the stress riser in place and the panel simply cracks again next to the patch. We look at fastener relief with oversized holes and bonded inserts, larger backing plates, isolators, and added local stiffness behind the repair.
How large a hole can be repaired instead of replacing the panel?
There is no single number, but the practical thresholds are about area, curvature, and what is behind it. A hole up to roughly a foot across in a flat or gently curved panel with sound framing behind it is normally a repair. Once the damage crosses a seam, sits in a compound curve that will be difficult to fair back to contour, involves crushed framing, or covers a large fraction of the panel, replacement gets competitive on both cost and quality. Labor at $210 per hour adds up fast on a big fairing job, and a factory panel arrives already flat and already contoured.
Will the repaired area match the rest of the coach?
On a painted coach, a properly blended repair should not be visible under normal light. We blend into the adjacent panels rather than trying to cut a hard edge, because a hard edge is exactly what your eye picks up. On a gelcoat finish, matching is harder. Twenty year old gelcoat has shifted in color and lost gloss, and new gelcoat sprayed next to it rarely matches even with careful tinting. On those coaches we often recommend refinishing to a natural break line such as a molding, a seam, or a body line, so there is no partial-panel transition to see.
How long does a fiberglass crack repair take?
Most single panel repairs run 5 to 15 business days. The glass work itself is often one or two days: grind the bevel, lay up the schedule, cure. What extends the calendar is everything after. Full cure and post-cure before any filler goes on takes at least a day and often more. Then blocking, priming, misting a control coat, block sanding again, paint, and paint cure. If the repair needs a blend across two or three panels or the coach has multi-stage graphics, add several days. Structural findings behind the panel, like bent framing, extend it further.
What does a crack repair typically cost?
The range is $750 to $6,500 or more. The low end is a short gelcoat crazing repair on a flat panel with a small blend. The middle is a stress crack at a front cap corner that needs stop-drilling, a scarf bevel, a laminate schedule, backing from inside, a fastener relief, and a blend into the cap and one adjacent panel. The top end is a large puncture with a bond halo, framing work behind it, and a blend across a multi-color graphics scheme. Estimates are paid and credited against an authorized repair, and anything over $2,000 takes a 50 percent deposit.
Should the repair be backed from the inside?
Yes, whenever access allows it. A one sided repair carries load only through the scarf bevel on the outer face. Adding a backing laminate on the inside roughly doubles the bonded area and puts material on the side of the panel that sees tension when the wall flexes outward. It also lets us use a slightly thinner outer repair, which means less material to fair and less risk of print-through. The reason it is not always done is access. On many sidewalls the back face is buried behind cabinets, insulation, and wiring, and the labor to reach it can exceed the benefit.
Is my crack an insurance claim or an out of pocket repair?
Impact damage from a collision, a road debris strike, or a tree branch is usually a claim, and we document it with photographs, tap maps of the bond halo, and a written repair plan. Age related crazing and stress cracking around fasteners generally are not, because they are wear rather than a sudden event. The gray area is a crack that existed as a hairline and then opened up during an impact. In that case what matters is documentation of the mechanism, and we write the estimate so an adjuster can see which portion of the damage is which.
Standard on every job
What is included
These are not upgrades. They are how the work is run on every vehicle that comes through the building.
Full teardown where it is needed
We do not estimate through a closed panel. If the damage path runs behind trim or skin, we open it and document what is actually there.
Written, itemized scope
Parts, labor hours, and materials listed separately against the posted rate, so every line is something you can question.
Direct carrier communication
We talk to the adjuster so you are not relaying technical detail between two parties who both expect you to already understand it.
Supplement handling
When teardown finds more than the original inspection, we document and submit the supplement rather than absorbing it into a vague overage.
Correct repair sequence
Structural before cosmetic, every time. A straight body over a bent frame is a repair that fails its second life.
Systems tested under load
Electrical, plumbing, generator, and climate systems are run and verified before delivery, not just reconnected and assumed good.
Photo documentation throughout
Before, during, and after. Useful for your records, and decisive if a claim is ever revisited.
Delivery walkthrough
We go over what was done, what was replaced, and what to watch, in person, with the vehicle in front of you.
How the work runs
Our six step repair process
The same sequence on every vehicle, whether it is a single coach or a fleet of box trucks.
- 01
Assessment and documentation
We put the vehicle on the floor, pull panels where we need to see behind them, and photograph everything. Hidden damage found now is damage that does not become a supplement argument later.
- 02
Written estimate
You get a line by line estimate with parts, labor hours, materials, and the posted rate applied to each. Nothing is bundled into a single number you cannot check.
- 03
Carrier coordination
If a claim is involved we deal with the adjuster directly, submit the documentation, and handle supplements when teardown reveals more than the first inspection showed.
- 04
Authorization and scheduling
Once the scope is approved we confirm the deposit, order parts, and give you a realistic slot. Special order parts drive the timeline more often than labor does.
- 05
Repair
Structural first, then body, then paint, then systems and interior. The sequence is not negotiable because each stage has to be right before the next one covers it up.
- 06
Quality check and delivery
Multi point inspection, systems tested under load, paint inspected under corrected lighting, and a walkthrough with you before the vehicle leaves.
Keep reading
Related pages
Related services
Vehicles we repair
Talk to a repair specialist today
Tell us what happened and we will tell you what the repair actually involves, what it costs, and how long it takes. We work directly with every major carrier and serve Westminster owners and fleets from our 35,000 square foot facility.
Posted labor rates are published on our prices page. Diagnostic and systems assessment fees are credited against an authorized repair.