Fiberglass and Delamination
RV Fiberglass Panel Replacement When Repair Runs Out
In short
RV fiberglass panel replacement makes sense once damage passes roughly a quarter of a panel, crosses seams, or sits in compound curvature that cannot be faired. At our Westminster shop the work runs $4,500 to $25,000 or more, and the two biggest variables are panel availability from the coach builder and how far the paint has to be blended.
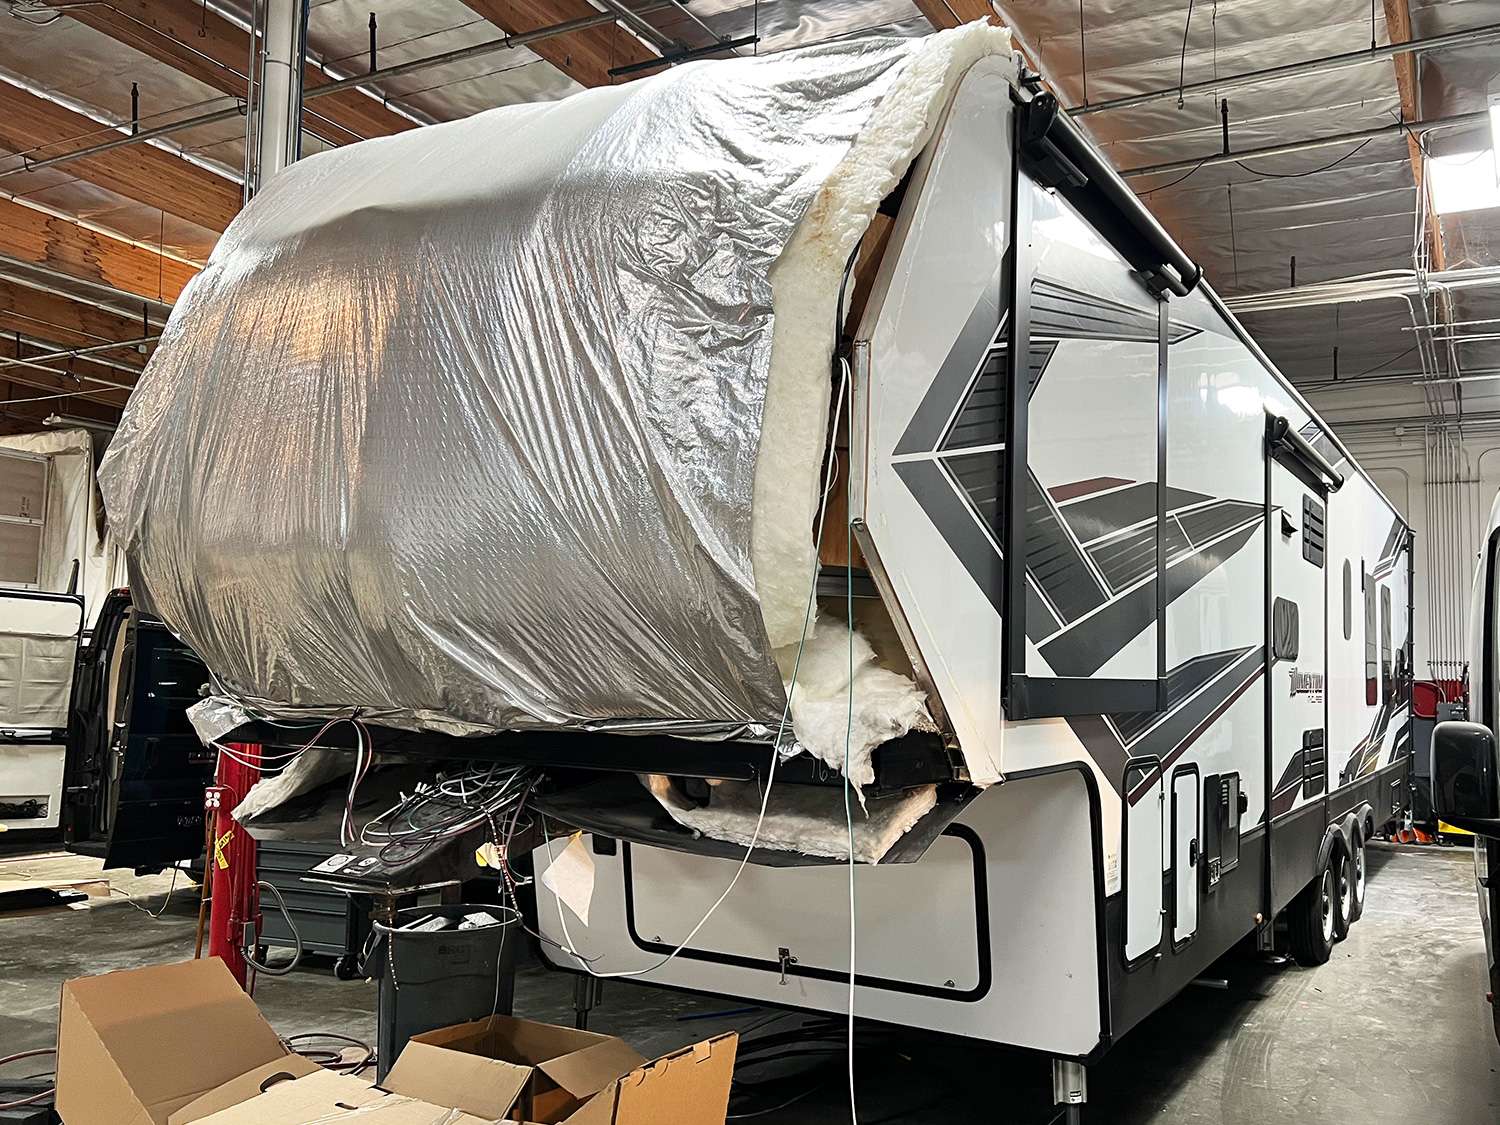
We recommend rv fiberglass panel replacement when the honest math says a repair will cost as much as a new panel and still look like a repair. That happens more often than owners expect, especially on large sidewalls, on molded front and rear caps, and on any panel where the substrate behind the skin is soaked. Our estimators in Westminster price both paths on the same sheet so you can see the comparison instead of taking our word for it.
Where the Repair Threshold Sits
There is no single rule, but there are reliable indicators. Once damage covers more than roughly a quarter of a panel, once there are multiple separate damage areas whose repair zones would overlap, once the damage crosses a panel seam, or once the substrate behind the skin is rotted across a wide area, replacement usually wins. Compound curvature is the other trigger. Fairing a large repair back to a curved contour is slow, skilled hand work, and slow skilled hand work at $210 per hour is exactly what makes a repair uneconomical.
The economics are easier to see when you put hours on paper. A large laminate rebuild plus fairing can consume 40 to 60 hours of body labor before any paint goes on. At the posted rate that is a five figure number by itself, and at the end of it you still have a hand faired surface that may print through in a year. A replacement panel arrives already flat, already contoured, and already the right thickness, and the labor shifts from fairing to removal, bonding, and sealing.
Quality is the third factor and it is not sentimental. A bonded factory panel restores the original sandwich construction and its original stiffness. A very large repair does not, no matter how well it is executed, because the repair laminate has different stiffness and different thermal behavior than the panel it sits in. On a coach you plan to keep for another decade, that difference eventually shows up as a visible outline or a new crack at the repair boundary.
- Damage covering more than about a quarter of the panel area
- Multiple damage zones whose scarf bevels would run into each other
- Damage that crosses a panel seam or a structural framing member
- Wet or rotted substrate across a wide area rather than one localized spot
- Compound curvature that would take many hours to fair back to contour
- A panel that has already been repaired once and failed at the repair boundary
Sourcing a Panel From the Coach Builder
The first call is always to the coach builder with the VIN, the model year, the floorplan code, and the serial number off the data plate. Sidewall panels are frequently built as continuous laminated stock and cut to length, which means the builder may sell you a sheet rather than a finished panel with cutouts. Molded caps are individual part numbers. Either way, the part number depends on details that are not obvious from the outside, which is why we do not order anything before we have the coach on site and documented.
Lead time is the honest problem. Panels and caps are low volume parts, and builders often produce them in batches rather than keeping stock. Four to twelve weeks is normal, and longer is not rare on a discontinued floorplan. We order the moment scope is authorized and the deposit clears, and we tell you the quoted date the supplier gave us rather than an optimistic one. If a date slips, you hear about it from us instead of finding out at pickup.
Freight is a real line item on this job. A 20 foot sidewall panel or a molded cap ships crated on a flatbed or an oversize carrier, and crating plus transport can run into four figures on its own. We inspect and photograph the crate before signing for it, because transit damage on a large fiberglass part is common and the claim has to be filed at delivery. A cracked panel discovered a week later is a much harder conversation with the carrier.
Discontinued Molds and the Fabrication Fallback
Plenty of coaches on the road were built by companies that no longer exist, or on models whose tooling was scrapped years ago. When the mold is gone, the panel is gone. That is the point at which a straightforward replacement job turns into a sourcing project. We check builder stock, aftermarket suppliers, and salvage inventory for a used cap or panel off a matching model, which is often the fastest and least expensive answer if one can be found in usable condition.
When nothing exists, we fabricate. On a flat or single curvature panel that means laminating new stock to the correct thickness and cutting it to the pattern taken off the old part. On a molded cap it means either taking a mold directly off the undamaged side of the existing part, or building a plug and pulling a mold from that, then laying up a new part in the shop. This is real work. Tooling and layup for a cap can add weeks and a meaningful share of the total.
A fabricated part will not be dimensionally identical to a factory part. Small differences in thickness, radius, and surface texture are unavoidable, and we plan for them at the fitting stage rather than discovering them at final assembly. That usually means more fitting time, more fairing at the seams, and a wider paint blend than a factory panel would need. We tell you that up front, because a fabricated cap quoted like a factory cap is how estimates go badly wrong.
- Builder stock and part number checked first, using VIN and data plate serial
- Aftermarket and salvage sources searched for a matching used panel or cap
- Pattern taken off the old part for flat and single curvature fabrication
- Mold pulled off the undamaged side, or a plug built, for molded caps
- Fabricated parts get extra fitting time and a wider blend allowance in the estimate
Filon Sheet Versus a Molded Cap
Filon is the common name for flat fiberglass reinforced polyester sheet, and it is what most flat RV sidewalls are made from. It ships in rolls or sheets, comes in thicknesses generally between about 0.045 and 0.090 inch, and it is laminated to luan and foam to form the wall sandwich. It comes in smooth and pebbled textures, and matching the existing texture is not optional. A smooth panel next to a pebbled one reads as wrong from thirty feet away even before you notice the color.
A molded cap is a completely different part. It is a single piece with compound curvature, sprayed gelcoat in the mold, and frequently molded-in features: light housings, ladder mount bosses, vent openings, and recessed areas for badges. You cannot fabricate those features into a flat sheet, and a cap is not something you cut down from stock. That is why cap replacement sits at the upper end of the price range while a flat sidewall section can land in the middle.
The labor profile differs too. A flat panel replacement is mostly careful layout, clean removal, substrate work, adhesive application, and clamping across a large area. A cap replacement is fitting work: aligning the part to the roof line, the sidewall seams, and the frame mounting points simultaneously, with shimming and trial fitting before any adhesive gets mixed. Fitting a cap correctly takes patience, and rushing it is how you end up with a seam that will not seal.
Bonding Adhesives, Clamping, and Seam Placement
Structural panel bonding is done with two part urethane or methacrylate adhesive, not contact cement and not construction adhesive out of a tube. These products have a defined open time, a specified bond line thickness, and a cure schedule, and all three have to be respected. We control bond line thickness with glass beads or a notched applicator, because an adhesive squeezed to nothing has no strength and a bond line that is too thick never fully cures in the middle.
Clamping is what separates a bonded panel from a stuck panel. Pressure has to be even across the entire surface for the full cure window, not just the tack time. Depending on the panel we use vacuum bagging, a bank of cauls with plywood platens and long clamps, or a full length press setup for a complete wall. Uneven pressure produces exactly the kind of localized bond failure that shows up two summers later as a wave, which is the problem you were trying to solve in the first place.
Seam placement is a design decision made before anything is cut. A joint that lands in the middle of a flat expanse will telegraph, no matter how well it is faired, because thermal movement across a bond line is different from movement across continuous laminate. We put seams where the coach already has a visual break: behind a molding, at a compartment door edge, under the awning rail, or at a body line. A well placed seam disappears. A convenient seam becomes the first thing you see.
- Two part urethane or methacrylate structural adhesive, mixed to ratio
- Bond line thickness controlled with glass beads or a notched applicator
- Even clamping pressure held for the full cure window, not the tack time
- Vacuum bag, caul bank, or full length press chosen to suit the panel size
- Seams placed at moldings, body lines, or door edges, never mid-panel
- Substrate flatness verified with a straightedge before adhesive is mixed
Rebuilding the Vapor and Water Barrier
The wall you just opened was a water management system, and it has to be rebuilt as one. That means butyl tape or backer material under every flange, sealant in the right chemistry at every penetration, and a preserved drainage path at the bottom of the cavity so any water that does get in has somewhere to go. Skipping the drainage detail is a classic mistake, because a perfectly sealed wall with no exit turns any small future leak into a much bigger delamination problem.
Sealant selection is not interchangeable. Butyl tape goes under flanges as a bedding compound. Non-sag polyurethane goes on vertical joints where you need a gunnable, paintable seal that stays put. Self-leveling sealant is for horizontal surfaces such as roof to sidewall transitions. Silicone stays off the coach entirely on any surface that will ever be painted or resealed, because nothing bonds to silicone residue and it contaminates everything around it for years.
Every penetration gets resealed on reassembly, not just the ones that were leaking. Window flanges, marker lights, awning rail fasteners, service door frames, exterior outlets, antenna bases, and roof edge trim all get pulled, cleaned back to substrate, rebedded, and torqued to a consistent spec. Then we water test the panel before final refinish, because finding a leak after paint means cutting into a finish we just delivered.
Paint Blending Drives the Final Number
A new panel shows up in raw gelcoat or primer and needs a complete refinish. That alone is a significant number, but the part that surprises owners is the blend. Factory paint has shifted over years of UV exposure, and even a formula matched to the original code will not match the panel next to it. So we blend: the new panel gets full coverage, and the adjacent panels get a graduated transition so your eye never finds an edge. On a solid color that might be one adjacent panel.
On a modern coach with a multi-stage graphics scheme, it is not one panel. Swoops and stripes run continuously down the side of the coach, so the blend has to carry across every panel a graphic touches, and each color layer has to be masked, sprayed, and cleared in sequence. That is how a $6,000 panel install turns into a $16,000 invoice. Body and paint labor is $210 per hour and paint supplies are $55 per paint hour, and a large graphics blend can run 40 to 70 hours.
Sometimes the better answer is repainting the entire side or the entire coach. If the existing finish is already chalked or has previous repairs in it, a blend will make those flaws more obvious by putting fresh paint next to them. We price both options at the estimate: panel plus blend, and panel plus full side. Owners are frequently surprised that the second option is not much more, and it ends the color matching problem permanently.
- New panels arrive raw or primered and always require full refinish
- Blending into adjacent panels is required because factory paint has shifted with UV
- Multi-stage graphics force the blend across every panel a stripe touches
- $210 per hour body and paint labor plus $55 per paint hour in supplies
- Full side repaint is quoted alongside the blend so you can compare real numbers
Questions
Frequently asked questions
How do you decide between repairing and replacing a panel?
We price both. The repair path gets an hour count for grinding, laminating, fairing, and blocking, and the replacement path gets panel cost, freight, removal, substrate work, bonding, sealing, and refinish. Then we put them side by side. Replacement usually wins once damage passes roughly a quarter of the panel, crosses a seam, sits in compound curvature, or the substrate is rotted over a wide area. Repair usually wins on smaller, localized damage in a flat or gently curved area with sound substrate behind it. There is also a quality argument: a bonded factory panel restores original stiffness in a way a very large repair does not.
What if the coach builder is out of business?
Then we work down a list. First, aftermarket suppliers who still stock generic laminated sheet in the right thickness and texture, which covers most flat sidewall situations. Second, salvage sources for a used panel or cap off a matching model and year, which is often the best answer for a molded cap if one turns up in usable condition. Third, fabrication in our shop: pattern the flat panel and laminate new stock, or pull a mold off the undamaged side of an existing cap and lay up a new part. Fabrication adds weeks and cost, and a fabricated part needs more fitting and a wider blend than a factory part would.
How long will panel replacement take?
Plan on 4 to 10 weeks. The shop work itself is typically two to four weeks: removal, substrate repair and drying, bonding with full cure time, resealing, and then refinishing with its own cure. What controls the calendar is the panel. Builder lead times of four to twelve weeks are normal on low volume parts, and a discontinued floorplan can run longer. We order as soon as scope is authorized and the deposit clears, and we schedule your bay time around the confirmed ship date rather than parking your coach here waiting on a crate.
Why is the paint such a large part of the estimate?
Because a new panel needs a complete refinish and the panels next to it need a blend. Factory paint drifts under UV exposure, so a color mixed to the original code will not match a ten year old panel beside it. Blending means spraying a graduated transition into the adjacent panels so there is no edge for your eye to catch. On a solid color that might be one neighbor. On a coach with multi-stage graphics, the stripes run the length of the side, so the blend follows them across several panels and every color layer has to be masked and sprayed in sequence. That is where the hours go.
Can you match the pebbled texture on my sidewall?
In most cases yes, because laminated fiberglass sheet is available in both smooth and textured finishes and the common textures are fairly standard. We match texture before we match color, because texture mismatch is visible from a distance while a small color difference is not. If we cannot source the exact texture, we tell you at the estimate and discuss the options, which usually means either accepting a close match on a panel that is not adjacent to a highly visible area, or replacing to a natural break line so the texture change lands at a seam instead of mid-wall.
Do you have to remove the interior to replace an exterior panel?
Not always, but sometimes. If the substrate and framing behind the panel are sound and dry, we can do the whole job from outside and your interior is never touched. If the luan is rotted, the framing is corroded, or insulation is waterlogged, we have to get to it, and depending on the coach the practical access may be from inside. We also need interior access anywhere fasteners, backing plates, or bonded brackets pass through the wall. We inspect and meter before quoting so the interior labor, if any, is in the number from the start.
What does a deposit look like on a job this size?
Any authorized repair above $2,000 takes a 50 percent deposit, and panel replacement is always above that. The deposit is what lets us order the panel, pay the freight and crating, and reserve the bay time, all of which happen before your coach is disassembled. The written estimate itself is paid work, and the $150 RV systems assessment is credited against an authorized repair. Parts carry 100 percent markup at or under $100 and 35 percent over $100, and sales tax of 7.75 percent applies to parts and materials but not to labor.
Will the replaced panel be as strong as the original wall?
It should be, and that is the main structural argument for replacement over a very large repair. The wall is a bonded sandwich, and its stiffness comes from the skin, the substrate, and the adhesive working together. A new panel bonded with a structural urethane or methacrylate adhesive under even clamping pressure across the full surface restores that system. The things that undermine it are all process failures: uneven clamping, wrong bond line thickness, bonding to a substrate that is still damp, or a seam placed where thermal movement will work it. Those are the details we do not shortcut.
Standard on every job
What is included
These are not upgrades. They are how the work is run on every vehicle that comes through the building.
Full teardown where it is needed
We do not estimate through a closed panel. If the damage path runs behind trim or skin, we open it and document what is actually there.
Written, itemized scope
Parts, labor hours, and materials listed separately against the posted rate, so every line is something you can question.
Direct carrier communication
We talk to the adjuster so you are not relaying technical detail between two parties who both expect you to already understand it.
Supplement handling
When teardown finds more than the original inspection, we document and submit the supplement rather than absorbing it into a vague overage.
Correct repair sequence
Structural before cosmetic, every time. A straight body over a bent frame is a repair that fails its second life.
Systems tested under load
Electrical, plumbing, generator, and climate systems are run and verified before delivery, not just reconnected and assumed good.
Photo documentation throughout
Before, during, and after. Useful for your records, and decisive if a claim is ever revisited.
Delivery walkthrough
We go over what was done, what was replaced, and what to watch, in person, with the vehicle in front of you.
How the work runs
Our six step repair process
The same sequence on every vehicle, whether it is a single coach or a fleet of box trucks.
- 01
Assessment and documentation
We put the vehicle on the floor, pull panels where we need to see behind them, and photograph everything. Hidden damage found now is damage that does not become a supplement argument later.
- 02
Written estimate
You get a line by line estimate with parts, labor hours, materials, and the posted rate applied to each. Nothing is bundled into a single number you cannot check.
- 03
Carrier coordination
If a claim is involved we deal with the adjuster directly, submit the documentation, and handle supplements when teardown reveals more than the first inspection showed.
- 04
Authorization and scheduling
Once the scope is approved we confirm the deposit, order parts, and give you a realistic slot. Special order parts drive the timeline more often than labor does.
- 05
Repair
Structural first, then body, then paint, then systems and interior. The sequence is not negotiable because each stage has to be right before the next one covers it up.
- 06
Quality check and delivery
Multi point inspection, systems tested under load, paint inspected under corrected lighting, and a walkthrough with you before the vehicle leaves.
Keep reading
Related pages
Related services
Vehicles we repair
Talk to a repair specialist today
Tell us what happened and we will tell you what the repair actually involves, what it costs, and how long it takes. We work directly with every major carrier and serve Westminster owners and fleets from our 35,000 square foot facility.
Posted labor rates are published on our prices page. Diagnostic and systems assessment fees are credited against an authorized repair.