Services
RV Fiberglass Repair Orange County: Sidewalls and Delamination
In short
Delamination is an adhesive failure between the fiberglass skin and the substrate behind it, not a paint problem. Injected repairs run roughly $1,500 to $6,000, and full panel replacement at our Westminster shop runs $8,000 to $30,000 or more depending on the wall.
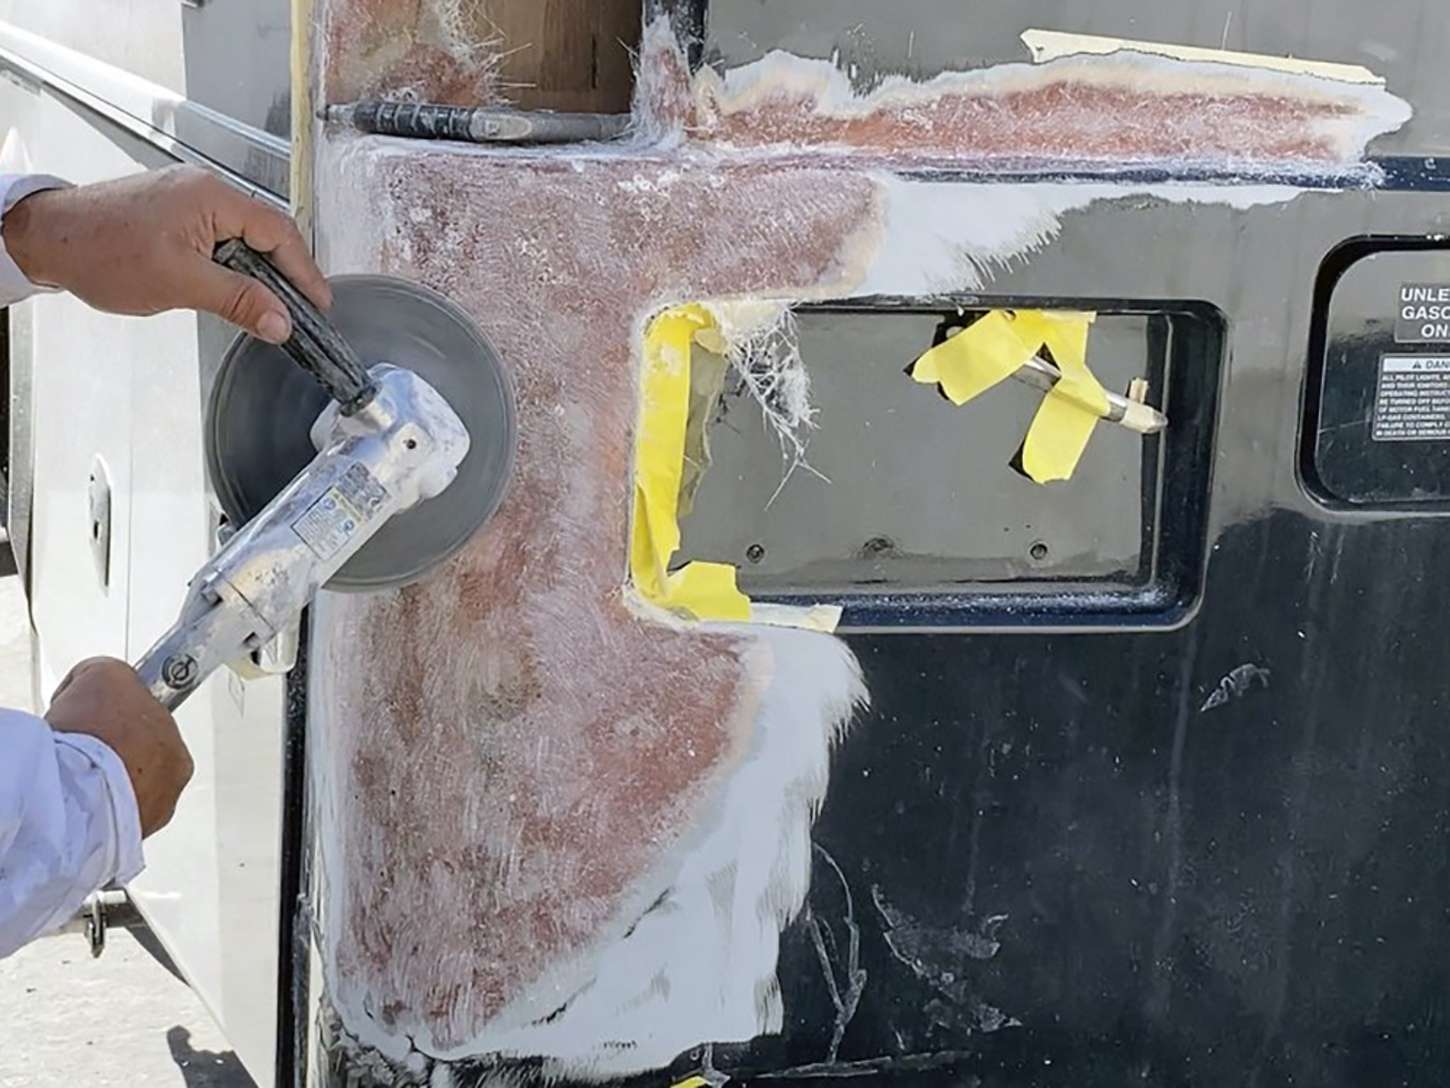
RV fiberglass repair Orange County owners ask about usually starts with the same symptom: a bubble, a wave, or a soft spot in a sidewall that used to be flat. That is delamination, and it is a bond failure, not a cosmetic blemish. We have been repairing laminated walls, cracked skins, and dull gelcoat since 2015 at our Westminster facility, and the fix depends entirely on how far the bond has let go and whether water is still getting in.
How an RV Sidewall Is Actually Built
From outside in, a typical laminated wall is gelcoat or paint, then a thin fiberglass skin, then a layer of adhesive, then luan plywood, then block foam insulation with aluminum or wood framing set into it, then more adhesive, then the interior wall panel. The whole sandwich is pressed together in a vacuum press or a roller press at the factory and cured as one piece. It is strong because of the bond, not because any single layer is thick.
That construction is why RV walls are light and stiff, and it is also why they fail the way they do. No mechanical fastener holds the skin to the luan. The adhesive is the only thing doing that job. When it lets go across an area, the skin stops carrying load with the core, and the panel loses stiffness even when nothing looks broken from ten feet away.
Some builders use filon, a fiberglass reinforced panel with a pigmented or painted surface, in place of a gelcoated skin. Others use smooth high gloss gelcoat over a hand laid skin. Both delaminate the same way. What changes is the refinish path, because filon is normally painted while gelcoat can be reflowed, sanded, and polished. Ask which one you have before you shop the repair, because the two paths carry different labor hours and different material costs.
What Delamination Really Is
Delamination is adhesive failure at the glue line, most often between the fiberglass skin and the luan. Push on the wall and it moves independently. Tap it and the sound changes from a tight thud to a hollow rattle. In raking sunlight you will see waves, ripples, or a raised bubble that was not there when the coach was new. In bad cases the skin lifts far enough that a feeler gauge slides under the edge.
The two usual causes are water and heat. Water reaches the luan through a failed seam or a fastener hole, the wood swells, and the swelling pushes the skin off the glue. Heat cycling does its own damage. A dark sidewall in Southern California sun can pass 160 degrees Fahrenheit at the surface, the layers expand at different rates, and years of that movement fatigue an adhesive that was never designed to be re-stressed daily.
Delamination spreads. Once the bond breaks, the open void wicks moisture, and the edge of the failure becomes the new weak point. A soft spot the size of a dinner plate this spring is often three feet across by the following spring. That is why we push owners to address it early. The panel replacement threshold is a size question, and the size only moves one direction.
Where the Water Gets In
Water almost never comes through the middle of a panel. It arrives at transitions: the roof to wall joint, corner moldings, window flanges, door frames, awning rail fasteners, service door edges, marker lights, and any place somebody drilled a hole for an accessory. Every one of those is sealed with butyl tape, a lap sealant, or a silicone type product, and every one of those sealants has a service life measured in years, not decades.
Screws are the sneaky one. An awning rail can carry forty fasteners running the length of a coach, each penetrating the skin and the luan. Butyl behind the rail seals them at the factory. Once that butyl hardens and shrinks, water follows the screw threads into the wood, and the first visible symptom shows up two feet below the rail as a stain or a bubble.
This is why a real delamination diagnosis includes a seam inspection, not just a look at the bubble. Repairing the panel without repairing the entry point produces a job that fails again. We map the water path first, rebuild or reseal the entry point, then repair the laminate. That sequence matters. A laminate repair done under an active leak has a scheduled failure date, and it is the most common reason an owner pays for the same wall twice.
- Roof to wall joint where the lap sealant has cracked or pulled away
- Window flanges where the butyl tape has hardened and shrunk
- Awning rail and ladder fasteners penetrating skin and luan
- Corner moldings with failed sealant hiding behind the trim
- Service door and compartment door frames
- Aftermarket holes drilled for antennas, cameras, and solar mounts
Tap Testing, Moisture Meters, and Mapping the Damage
We start with a plastic mallet or a knuckle and work a grid across the wall, listening for the change from solid to hollow. The boundary is usually sharper than owners expect, and we mark it with tape right on the coach so you can see the real footprint. A bubble the size of a hand very often sits inside a three foot delaminated zone that has not lifted visibly yet.
Then comes moisture. A pin type meter reads the wood directly through small probe holes in a discreet area, and a pinless meter scans without penetration. Readings under about twelve percent are normal for dry luan in this climate. Readings in the high teens and twenties mean active wetting, and readings above thirty mean the wood is saturated and probably decayed rather than merely damp.
Those two data sets decide the repair. Dry wood with a limited void is an injection candidate. Wet wood, soft luan, or a void larger than roughly eight to ten square feet moves the job toward panel removal, because injecting adhesive into rotten substrate bonds the skin to material that has already lost its strength. We mark the mapped boundary in tape on the coach and photograph it, so the square footage on the estimate ties to something you can see.
- Tap grid mapped and taped so the true void size is visible
- Pin and pinless moisture readings recorded by location
- Interior wall base and floor edge checked for softness and staining
- Seams, fasteners, and moldings inspected to find the entry point
- Photographs and readings filed with the written estimate
Injection Versus Full Panel Replacement
Injection repair drills a pattern of small ports through the skin, sets a vacuum press or clamped platens against the wall, and forces a low viscosity structural epoxy into the void. Done correctly on a dry, limited area, it re-bonds the skin to sound luan and the wall goes back to flat and stiff. The ports get filled, faired, and refinished. It is the cheaper path and it works, but it has real limits.
It fails when the substrate is wet or rotten, when the void is very large, when the skin has stretched and will not lay back flat, or when framing behind the wall is compromised. In those cases the honest answer is panel replacement: strip the exterior trim, cut the skin loose, remove the old luan and any decayed framing, rebuild the core, and laminate a new skin with fresh adhesive under even pressure.
Cost separates the two clearly. Injection work commonly lands between $1,500 and $6,000 depending on area and access. Panel replacement on a large motorhome sidewall with paint typically runs $8,000 to $30,000 and can go higher when windows, slide openings, and full body graphics are involved. We tell you which one your wall actually needs, and we show you the tap map and the meter readings behind that call.
- Injection suits dry substrate and voids under roughly ten square feet
- Panel replacement answers wet luan, rot, or damaged framing
- Skin that has stretched or creased will not lay flat again with injection
- Both paths require the water entry point to be rebuilt first
- Both paths end in refinish work, either gelcoat or paint
Gelcoat Chemistry, Cure Times, and Color Match
Gelcoat is a pigmented polyester or vinyl ester resin, sprayed or brushed, that cures into the surface rather than sitting on it as a film the way paint does. It is thick, sandable, and repairable, which is its main advantage. A chip or a crack can be filled with matching gelcoat, cured, block sanded through progressively finer grits, then buffed back to gloss with compound and polish.
It also has quirks. Polyester gelcoat needs to be sealed from air to cure fully at the surface, so we spray a wax additive layer or a polyvinyl alcohol film over the repair. Cure time depends on catalyst ratio, film thickness, and shop temperature. Rushing it produces a soft, tacky repair that hazes months later. We let repairs cure properly before sanding, and that patience is part of why gelcoat work carries real labor hours.
Color match on an older coach is the hard part. Factory white gelcoat oxidizes and yellows over years of ultraviolet exposure, so new material tinted to the original formula will not match the wall beside it. We tint to the aged panel, spray out a test card, and check it in daylight. When the wall is too far gone, painting the whole side is often the better looking and cheaper outcome.
Coastal Sun and Humidity Loads on a Laminated Wall
Southern California is hard on laminated walls in two opposite ways. Ultraviolet exposure is high year round, which oxidizes gelcoat, chalks the surface, and drives heat cycling in the panel. At the same time, coastal marine layer conditions keep humidity up overnight, so a wall that reached 150 degrees at three in the afternoon is damp again at six the next morning. That daily swing is exactly what fatigues an adhesive bond.
Coaches stored outdoors year round show it first. We see chalky, dull gelcoat at four to six years without protection, and first bubbles at eight to twelve years on units that were never resealed. Coaches kept under cover or coated regularly go much longer. None of that is a defect. It is the environment doing what it does to a panel that was pressed together with adhesive.
The practical takeaway is maintenance timing. Inspect and reseal seams every year, ideally before the wet season. Keep the surface protected with wax, a sealant, or a ceramic coating so ultraviolet does not chew the gelcoat. Address a soft spot the season you notice it rather than the season after, because the repair category changes with size. A soft spot the size of a dinner plate is a manageable repair. The same spot two seasons later is often a panel.
- Annual seam and fastener inspection before the wet months
- Reseal roof to wall joints and window flanges on a schedule, not on failure
- Keep gelcoat protected so ultraviolet does not chalk the surface
- Check interior wall bases and floor edges for softness each year
- Address small voids early, before they cross the panel replacement threshold
In this category
Services we perform
Delamination Repair
Delamination is an adhesive bond failure between the outer fiberglass skin and the luan substrate behind it, almost always after w...
Read moreFiberglass Crack and Hole Repair
A structural fiberglass repair is not filler. The damaged laminate is ground out to a long scarf bevel, rebuilt with mat and biaxi...
Read moreFiberglass Panel Replacement
RV fiberglass panel replacement makes sense once damage passes roughly a quarter of a panel, crosses seams, or sits in compound cu...
Read moreGelcoat Restoration
Oxidation is a dead, chalky layer of gelcoat, not dirt, so washing and waxing will never fix it. Restoration means abrading that l...
Read moreQuestions
Frequently asked questions
What does delamination look like before it gets bad?
Early delamination usually shows as a subtle wave or ripple in a sidewall that used to be flat, most visible when you stand at one end of the coach and sight down the panel in raking light. Later it becomes a raised bubble or a soft area that flexes when you press it. The sound test is more reliable than the eye: tap across the wall with a knuckle and listen for the change from a tight thud to a hollow rattle. Owners often find the sound boundary is two or three times larger than the visible bubble.
Can delamination be repaired without removing the panel?
Often, yes. If the luan behind the skin is dry, the void is under roughly ten square feet, and the skin has not stretched or creased, we can inject a low viscosity structural epoxy through small ports and press the wall flat while it cures. That path runs about $1,500 to $6,000. Injection is the wrong answer when the substrate is wet or rotten, when framing is damaged, or when the void is large, because you would be bonding the skin to wood that has already lost its strength. Tap mapping and moisture readings decide it, not the size of the bubble.
How much does delamination repair cost?
Small injected repairs generally land between $1,500 and $6,000 depending on area, access, and how much trim has to come off. Full sidewall panel replacement on a large motorhome usually runs $8,000 to $30,000 and can exceed that when slide openings, windows, or full body graphics are involved. Body and paint labor is $210 per hour and paint supplies add $55 per paint hour. Work above $2,000 takes a 50 percent deposit. The range is wide because the entry point repair, the substrate condition, and the refinish scope vary far more than the bonding work itself.
Will I be able to see the repair afterward?
On a painted coach, a properly blended repair is very difficult to spot, because we feather the color into adjacent panels and clear the whole section to a natural break line. On a gelcoated coach it depends on the age of the surrounding surface. New gelcoat tinted to the factory formula will not match a wall that has yellowed for twelve years in the sun, so we tint to the aged panel and spray test cards in daylight before committing. If the wall is heavily oxidized, painting the entire side usually looks better and costs less than chasing a gelcoat match.
My wall bubbled and I never had a leak inside. How?
Water rarely announces itself inside the coach. It enters at a seam or a fastener, soaks into the luan inside the wall sandwich, and swells the wood, which pushes the skin off the adhesive. The interior panel can stay dry and clean the whole time, because the moisture is trapped in the middle of the sandwich. Heat is the other cause. A dark wall in Southern California sun cycles between very hot afternoons and damp coastal mornings, and years of that expansion and contraction fatigue the glue line with no water involved at all.
How long does a fiberglass repair take?
An injected repair with refinish work is generally one to two weeks, most of which is cure time and finish work rather than the injection itself. Panel replacement runs four to ten weeks and can go longer when skin material has to be ordered or a molded piece is discontinued. Gelcoat and epoxy both need real cure time before sanding, and rushing that step is how repairs haze or go soft months later. If the wall came apart because of a leak, add time for rebuilding the seam or window flange that let the water in.
Should I refinish in gelcoat or paint?
It depends on the coach and how much surface is involved. Gelcoat makes sense on a unit with a healthy gelcoat finish and a localized repair, because it is thick, sandable, and buffs to a deep gloss that matches the original surface character. Paint makes sense when the existing finish is already painted, when the repair covers a large area, or when the surrounding gelcoat has oxidized past the point where a tinted match will look right. Paint also opens up color and graphic options that gelcoat cannot practically produce on a coach this size.
Does insurance cover delamination?
Usually not on its own. Most policies treat gradual water intrusion, adhesive failure, and ultraviolet degradation as maintenance rather than a covered loss. Where coverage does apply is when delamination results from a specific covered event, such as a collision that opened a seam or a falling limb that punctured the wall. In those cases we document the mechanism carefully, separating the impact damage from any pre-existing moisture, so the adjuster can see which is which. It is worth filing and letting the carrier decide, but plan financially as though the repair will be out of pocket.
Keep reading
Related pages
Other service areas
Vehicles we repair
Talk to a repair specialist today
Tell us what happened and we will tell you what the repair actually involves, what it costs, and how long it takes. We work directly with every major carrier and serve Westminster owners and fleets from our 35,000 square foot facility.
Posted labor rates are published on our prices page. Diagnostic and systems assessment fees are credited against an authorized repair.