Roof, Slides and Awnings
RV Rubber Roof Repair for EPDM and TPO Membranes
In short
Rubber roof repair means resealing penetrations, patching damaged membrane, or bonding in a new membrane section where a seam has separated. Most jobs run $750 to $4,500 and take 2 to 6 business days. The deciding factor is not the membrane, it is whether the wood deck underneath is still dry and firm.
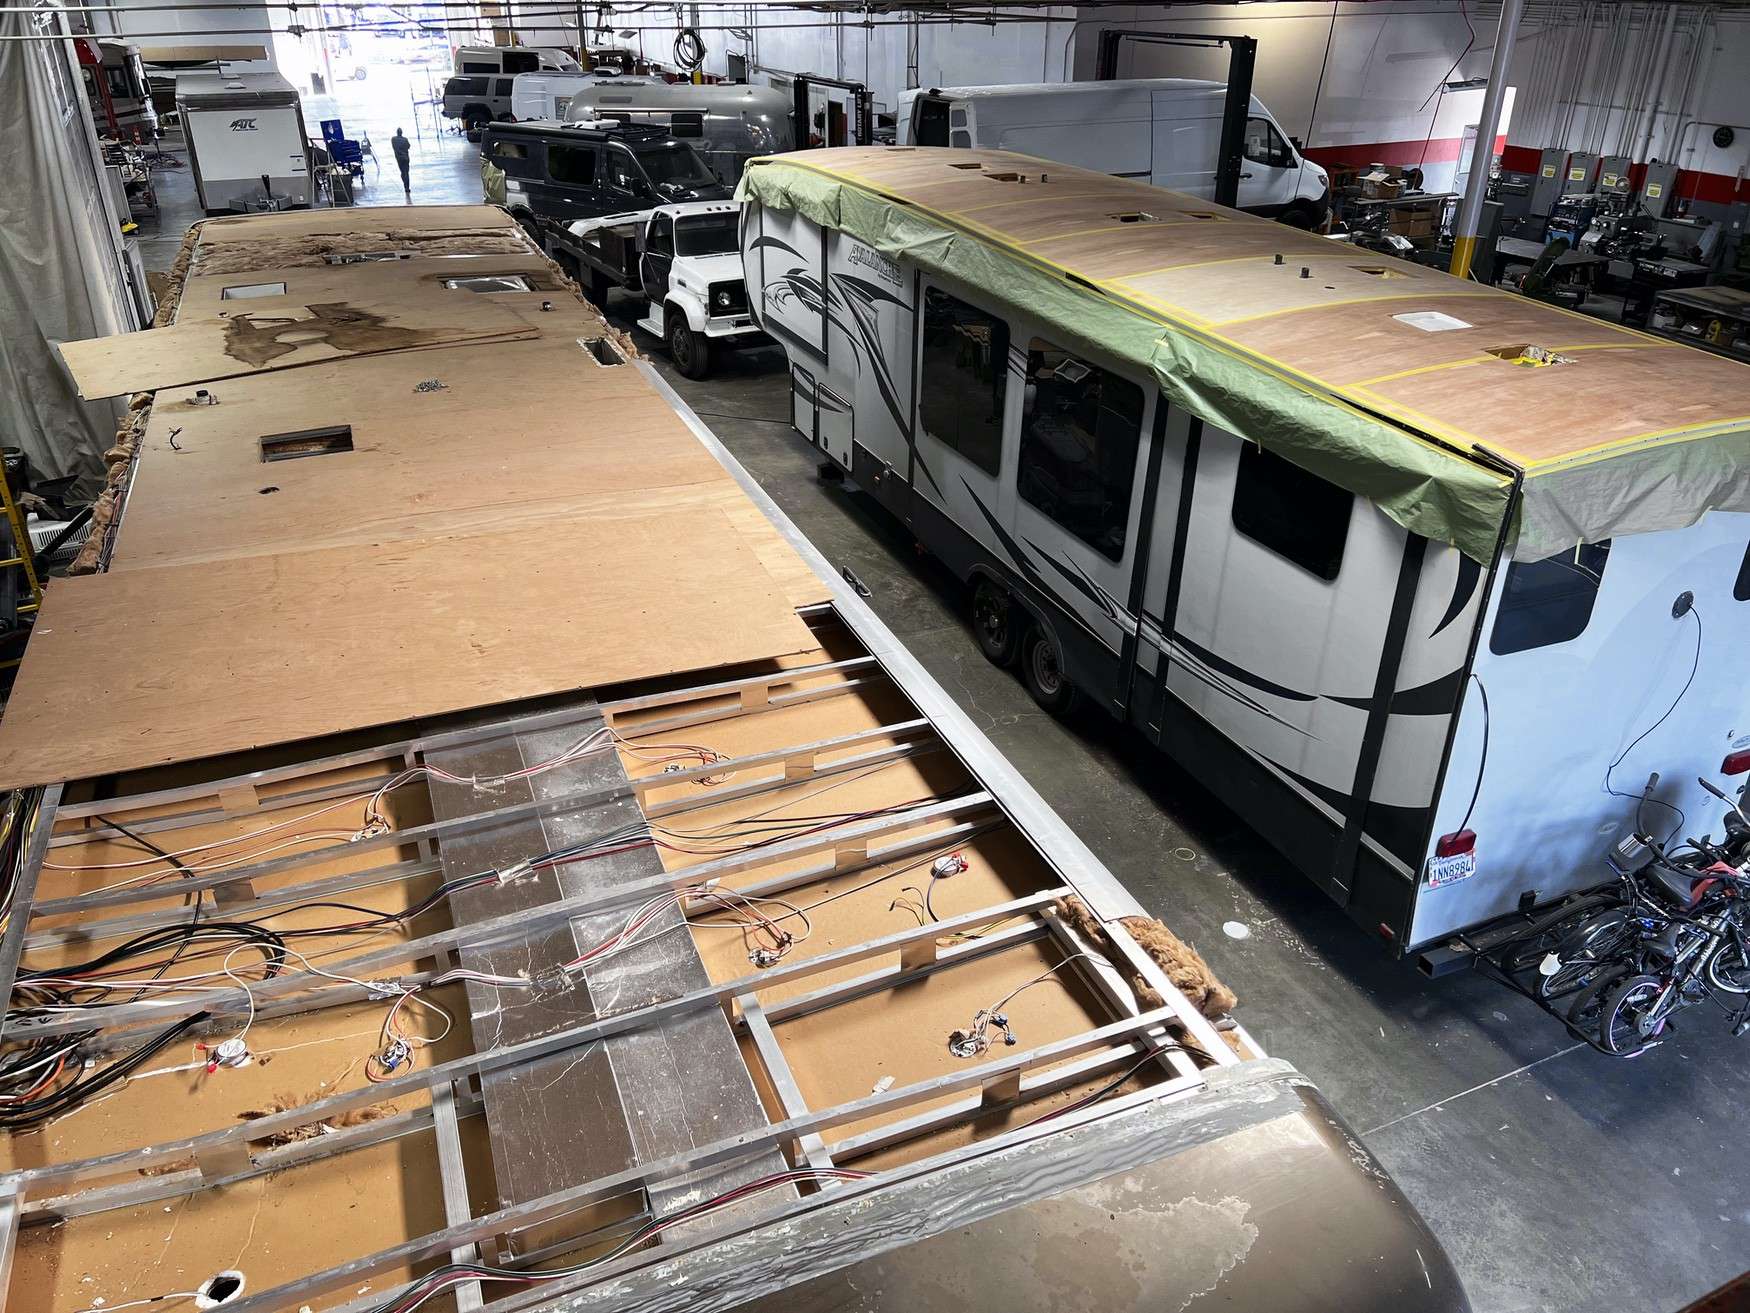
Good rv rubber roof repair starts with two questions: which membrane do you actually have, and is the deck under it still solid. Everything else follows from those answers. For Westminster owners the usual story is a cracked sealant bead at a vent flange that has been quietly feeding water onto luan plywood for a couple of seasons. We probe the deck first, then decide whether a patch is honest work or whether you are paying to postpone a replacement.
Telling EPDM and TPO Apart Before Anyone Touches It
EPDM and TPO look similar from a ladder and behave nothing alike once you start bonding to them. EPDM is a synthetic rubber sheet with a coated weather side. It feels soft and slightly grippy, and as it ages the surface sheds a fine white or gray powder. TPO is a thermoplastic. It feels stiffer, closer to a hard plastic sheet, it stays white, and it can be heat welded to itself, which EPDM cannot.
The identification test takes thirty seconds. Wipe a damp white rag across a clean area of the roof. Chalky residue on the rag means EPDM. A clean rag on a roof that is not simply dirty means TPO. If seams are visible and look melted together rather than taped or glued, that is a TPO weld. Model year helps too, since TPO became common on mainstream coaches well after EPDM.
This matters because adhesives are membrane specific. EPDM bonding adhesive will not develop proper strength on TPO. TPO primers and welds do nothing useful on EPDM. Using the wrong system produces a patch that looks perfect on delivery day and lifts at a corner within one summer. Getting this wrong is the single most common reason we end up redoing someone else's repair.
- Damp white rag test: chalk on the rag points to EPDM
- Feel test: EPDM is soft and rubbery, TPO is stiff and plastic
- Seam appearance: welded seams mean TPO, taped or glued seams usually mean EPDM
- Underside color: EPDM is often black under the white weather coating
- When in doubt, the coach build sheet settles it and costs you nothing but a phone call
Chalking, Seam Separation and Punctures
Chalking is normal aging on EPDM and by itself it is not a leak. It is the coated surface breaking down under UV. What chalking tells you is age, and an EPDM roof that chalks heavily is typically past ten years and getting thin. The practical problem with chalking is adhesion. You cannot bond a patch to a chalked surface without stripping that layer first, and skipping that step is why so many owner patches let go.
Seam separation is a real leak and it is the failure we see most on EPDM. Factory seams sit at the roof edges and around large penetrations, held with seam tape or adhesive plus a sealant cover. When the sealant cover cracks and water gets to the seam edge, the bond peels progressively. You can often lift a separated seam with a fingernail. That is a repair, not a monitoring item.
Punctures come from tree branches, ladders, and people setting tools down. A clean puncture in the field of a sound membrane is the best case scenario in this entire category. The membrane is fine everywhere else, the deck is usually still dry if it is caught early, and a properly prepped patch will outlive the rest of the roof. Punctures only become expensive when they sat through a rainy season unnoticed.
- Chalking: age indicator, blocks adhesion, must be stripped before any patch
- Seam separation: progressive peel, common at roof edges and cap terminations
- Punctures: cheap if caught early, expensive if they fed the deck for a season
- Shrinkage: older EPDM pulls away from trim strips and exposes fastener heads
- Blistering: membrane lifting off the deck, almost always means trapped moisture below
- Ponding stains: low spots that hold water accelerate every failure listed above
Lap Sealant Versus a Real Membrane Patch
Self leveling lap sealant is designed to seal around penetrations and cover seam edges on a horizontal surface. It flows out, it stays flexible, and it is the correct product for a vent flange or a trim strip. It is not a structural repair material. Smearing it over a two inch tear does two things: it hides the tear from anyone inspecting the roof, and it fails in a season because sealant has no tensile strength across a gap.
A membrane patch is a different job. The area gets cleaned and the chalk stripped, the damaged section is squared off, an appropriately sized piece of matching membrane is cut with rounded corners, adhesive or primer is applied per the manufacturer's system, the patch is rolled down to eliminate air, and only then is the perimeter sealed. Rounded corners matter because square corners are where peel starts.
Here is the honest line between them. If the damage is smaller than a quarter and sits in solid membrane with a firm deck underneath, sealant over a small reinforcing patch is legitimate and will hold. Anything larger, anything at a seam, and anything on a membrane that is already shrinking or heavily chalked needs a real patch or a section replacement. Sealant used as a substitute for a patch is money you spend twice.
Checking the Substrate Before Spending a Dollar
Before we quote any rubber roof repair we walk the deck and probe it. A sound deck feels firm and consistent underfoot with no give between rafters. A compromised deck feels spongy, and you can usually map the wet area by feel alone. Luan plywood, which is what most coaches use, is thin and it wicks moisture sideways, so a wet area is almost always larger than the visible stain suggests.
If probing finds softness, we open the membrane at the edge of the soft zone rather than guessing. That means cutting a controlled flap, looking at the actual plywood, checking whether the rafter tops are dark and swollen, and measuring how far the damage runs. That inspection is chargeable work, but it is the only way to give you a number that does not double once the roof comes apart.
This is where a repair stops being worth doing. If soft decking runs across more than roughly a third of the roof, or the damage crosses several rafter bays, patching the membrane is spending real money to cover wet wood. In that case we will tell you the repair is not honest and quote a replacement instead. Owners are never happy to hear it, but they are considerably less happy to hear it after paying for the patch.
- Walk and probe the full deck, not only near the visible stain
- Check under every roof penetration, since that is where water entered
- Look at rafter tops through a controlled opening before quoting
- Interior signs count: ceiling stains, soft wall tops, musty cabinet smells
- More than roughly a third of the deck soft means replacement, not repair
Prep, Adhesion and Cure Times
Prep is most of the labor and all of the durability. The repair area gets washed to remove road film, then an EPDM roof gets its chalk layer stripped with the correct cleaner until a rag comes back clean. Old sealant around any penetration in the work zone gets scraped back to bare flange, not merely topped up. Solvent wipe follows, and the surface has to flash off completely before adhesive touches it.
Adhesive and primer are then applied to both surfaces where the system calls for it, allowed to tack, and mated. We roll patches from the center outward with a seam roller to drive out air, because an air pocket becomes a blister the first hot afternoon. Fasteners and trim go back with fresh butyl, never reused butyl. Only after all that does self leveling sealant go on as the final weather cover.
Cure times are not negotiable and they are why a small repair still occupies a bay for days. Bonding adhesive wants several hours before the roof takes any load. Self leveling sealant skins in a few hours but needs 24 to 48 hours to cure through, and it should not see rain or a wash during that window. We do not release a coach the same afternoon we seal it, and any shop that does is handing you a repair that has not set.
Walking a Roof Without Making It Worse
Not every RV roof is rated to walk on, and the ones that are still have rules. Laminated roofs with foam block cores generally support weight across the whole surface. Older stick built roofs with thin luan over widely spaced rafters do not, and stepping between rafters is how owners turn an inspection into a repair. If you do not know which you have, assume the worst and step only directly over a rafter line.
Use a stable ladder rated for your weight plus tools, and get on and off at the rear ladder mount if the coach has one, since that area is reinforced. Soft soled shoes only. Hard soles and heels concentrate load and grind grit into the membrane, and grit embedded in EPDM becomes a future puncture. Never drag a toolbox across the surface.
Two practical cautions. Wet EPDM is genuinely slick, closer to ice than to wet concrete, so do not go up after a wash or a rain. And keep away from the edges, because the outer six inches sit over the sidewall top plate with nothing under the membrane but trim. If any of this makes you uncomfortable, that instinct is correct, and an inspection from us is cheaper than a fall or a new roof section.
- Step over rafter lines if the roof is not rated for full walking
- Soft soled shoes only, no hard heels, no dragged tools
- Do not walk a wet membrane, EPDM gets dangerously slick
- Stay off the outer edges above the sidewall top plate
- Carry nothing you would not want to drop through the roof
What Rubber Roof Repair Actually Costs
Body and paint labor is $210 per hour, and that is the rate for all membrane, sealing and decking work. Parts carry 100 percent markup at or under $100 and 35 percent above $100, and parts and materials are taxed at 7.75 percent. Labor is not taxed in California. Estimates are paid work and that amount is credited against an authorized repair, because a real roof estimate means getting up there and probing the deck rather than reading a photo. Here is how the numbers build on two typical jobs.
Small job, bottom of the range. A cracked sealant bead at two vent flanges with a firm deck: 3.0 hours at $210 equals $630. Materials are 3 tubes of self leveling sealant at $66 cost, which bills at $132, plus cleaner and prep supplies at $30 cost, which bills at $60. Parts total $192, tax on parts is $14.88. Out the door, $836.88.
Mid range job with a real patch. A 2 foot by 3 foot damaged EPDM section over a dry deck plus a full reseal of the surrounding penetrations: 6.5 hours at $210 equals $1,365. Materials are a 4 by 8 EPDM section at $190 cost billing at $256.50, bonding adhesive and primer at $95 cost billing at $190, and 4 tubes of self leveling sealant at $88 cost billing at $176. Parts total $622.50, tax on parts is $48.24. Total $2,035.74, and because that clears $2,000 a 50 percent deposit applies toward the total.
What pushes a job toward the top of the range is decking. Once we are cutting the membrane back, replacing plywood across two or three rafter bays, bonding the membrane down again and reinstalling every component we disturbed, labor roughly doubles and material roughly triples. That is how a repair lands near $4,500. Past that point we stop calling it a repair and start quoting a replacement, because the tear off and reinstall labor is the same either way and you should not pay for it twice.
Questions
Frequently asked questions
Can a rubber roof be patched, or does the whole thing have to come off?
Most rubber roofs can be patched, and patching is the right call more often than people expect. What determines it is the deck, not the membrane. If the plywood under the damage is firm and dry and the surrounding membrane is not badly shrunken, a properly prepped patch bonds permanently and outlasts the rest of the roof. If the deck is soft in the repair area, a patch seals wet wood in and buys you months. We probe the deck before quoting and open a controlled flap where we find softness, so the answer you get is based on what the wood is actually doing rather than what the surface looks like.
Why does my roof leave white chalk on my hands?
That is normal aging on an EPDM membrane. The weather side of EPDM has a coated layer that breaks down slowly under UV and releases as a fine powder. Chalking alone is not a leak and it does not mean the roof has failed. What it does tell you is that the membrane has real age on it, typically ten years or more in Southern California sun, and that it is getting thinner. The practical consequence is adhesion: nothing bonds to a chalked surface. Any patch, tape or sealant applied over chalk without stripping it first will lift, which is why so many owner repairs fail within a season.
Is self leveling lap sealant enough to fix a tear?
For a pinhole or a nail sized puncture in otherwise sound membrane, sealant over a small reinforcing patch is legitimate and will hold. For an actual tear, it is not. Sealant has no tensile strength across a gap, so as the membrane moves with temperature the sealant splits along the same line and you are back where you started, except now the damage is hidden under a gray smear that an inspector will not see. Tears need the damaged area squared off and a matching membrane patch bonded with the correct adhesive system, rolled flat, then sealed at the perimeter. Sealant is the weather cover on that repair, not the repair itself.
How long does the shop need for a rubber roof repair?
Two to six business days for most repairs, and cure time is the reason rather than labor hours. A patch may take six or seven hours of actual work, but bonding adhesive needs hours before the roof can take any load, and self leveling sealant needs 24 to 48 hours to cure through before the coach sees rain or a wash. We also want the roof to sit overnight after sealing so we can look at it again in the morning before release. If decking has to be opened and replaced, add three to five days. Rushing the cure is how a good repair becomes a callback.
How can I tell if the wood under my membrane is rotted?
Walk the roof, carefully, and pay attention to how it feels underfoot. Sound decking is firm and consistent. Wet or rotted decking feels spongy and gives slightly, and you can usually trace the boundary of the wet area by feel. Look for depressions that hold water after a rain, and for membrane that has lifted or blistered, since trapped moisture below is a common cause. From inside, check ceiling panels for faint brown lines, press the wall top edges for softness, and open upper cabinets and smell for must. The only certain answer comes from opening a small controlled flap of membrane and looking at the plywood directly.
What does a rubber roof repair cost on a 30 foot coach?
Plan on $750 to $4,500 and let the deck decide where you land. A resealing pass at a couple of vent flanges with firm wood runs about three hours of body labor at $210 per hour plus a couple hundred in materials and tax, which lands near $840. A real membrane patch over a dry deck with a full reseal of the surrounding penetrations is closer to six or seven hours plus $600 in marked up materials, landing near $2,000. Once decking has to come out in multiple rafter bays, labor and material both climb hard and a replacement usually becomes the better value.
Do I need a deposit for this kind of work?
Only if the authorized total is above $2,000, in which case we take a 50 percent deposit before ordering material. That deposit is applied to your invoice, it is not an extra charge. The reason is that membrane comes in coach specific widths and lengths and is not returnable once cut, and specialty adhesives have shelf life once opened. Smaller repairs do not require a deposit. Estimates are paid work and that amount is credited against an authorized repair, because an honest roof estimate means getting on the roof, probing the deck, and often opening a section to look at the plywood rather than guessing from a photo.
Should I have the roof coated after the repair?
If the membrane is sound and the deck is dry, a UV coating is a reasonable maintenance spend and it will slow chalking and add a few years to a tired but healthy roof. If any part of the deck is soft, do not coat it. A coating seals moisture into wood that needs to dry out, and it covers up the exact visual evidence that a future inspector or buyer needs to see. We will tell you honestly which situation you are in. Coating is also not a substitute for maintaining sealant at penetrations, which still needs inspection twice a year and renewal every three to five years here.
Standard on every job
What is included
These are not upgrades. They are how the work is run on every vehicle that comes through the building.
Full teardown where it is needed
We do not estimate through a closed panel. If the damage path runs behind trim or skin, we open it and document what is actually there.
Written, itemized scope
Parts, labor hours, and materials listed separately against the posted rate, so every line is something you can question.
Direct carrier communication
We talk to the adjuster so you are not relaying technical detail between two parties who both expect you to already understand it.
Supplement handling
When teardown finds more than the original inspection, we document and submit the supplement rather than absorbing it into a vague overage.
Correct repair sequence
Structural before cosmetic, every time. A straight body over a bent frame is a repair that fails its second life.
Systems tested under load
Electrical, plumbing, generator, and climate systems are run and verified before delivery, not just reconnected and assumed good.
Photo documentation throughout
Before, during, and after. Useful for your records, and decisive if a claim is ever revisited.
Delivery walkthrough
We go over what was done, what was replaced, and what to watch, in person, with the vehicle in front of you.
How the work runs
Our six step repair process
The same sequence on every vehicle, whether it is a single coach or a fleet of box trucks.
- 01
Assessment and documentation
We put the vehicle on the floor, pull panels where we need to see behind them, and photograph everything. Hidden damage found now is damage that does not become a supplement argument later.
- 02
Written estimate
You get a line by line estimate with parts, labor hours, materials, and the posted rate applied to each. Nothing is bundled into a single number you cannot check.
- 03
Carrier coordination
If a claim is involved we deal with the adjuster directly, submit the documentation, and handle supplements when teardown reveals more than the first inspection showed.
- 04
Authorization and scheduling
Once the scope is approved we confirm the deposit, order parts, and give you a realistic slot. Special order parts drive the timeline more often than labor does.
- 05
Repair
Structural first, then body, then paint, then systems and interior. The sequence is not negotiable because each stage has to be right before the next one covers it up.
- 06
Quality check and delivery
Multi point inspection, systems tested under load, paint inspected under corrected lighting, and a walkthrough with you before the vehicle leaves.
Keep reading
Related pages
Related services
Vehicles we repair
Talk to a repair specialist today
Tell us what happened and we will tell you what the repair actually involves, what it costs, and how long it takes. We work directly with every major carrier and serve Westminster owners and fleets from our 35,000 square foot facility.
Posted labor rates are published on our prices page. Diagnostic and systems assessment fees are credited against an authorized repair.